


Stw402 wrote:Well done in getting over the half way point, this part 7-12 of how to build a world you can view part 1-6 here:-
http://builders.forumotion.net/caw-101-f122/building-a-world-part-1-6-t1007.htm
Part 7-12 will cover everything that is yet to be completed.
Part 7
Get the coffee this is a big section, we will cover a great deal in this part.
If you have been following this guide, you will probable be already, a good few weeks into building your world, might be even longer on a big world, so lets crack on, I can promise you this when this section is complete, you will be on the last steps of building your world.
Lots
You have several options to you when building lots for your world
1) Build all the lots yourself, the downside to this is the length of time you will need to build so many lots.
2) Use EA lots, this can be great resource for you building your worlds, it will greatly speed up the time, the best method for collecting lots is go into each of your EA installed world, including any holidayworlds and collect a large number of lots your library. To give the lots a different look than the EA lots, spend a little time with each lot, edit the roof color and wall colors and suddenly you have over 300 lots with many different looks.
3) Ask for donations or start a Community project, both methods a similar, your trying to get people interested in your world, the more people who take a interest, the more lots you will get donated. This will only take you so far, you will probable need to make a number of lots yourself or edit EA lots.
4) Use lots from the exchange, thou this is not against the law or against any EA policy, you can just download the lots you wish to use, the downside to this method many people do not like you doing this. It's better to try and get permission, most builders will help world builders if asked.
At this stage it's better to have more lots than your ever going to use, so when you place lots into your world you have greater selection to choose from.
So the next step will be to place your lots, it impossible to do a guide with all possibilities that worlds can have, but try to have at least one central area. Think about your own town while you place the lots, common sense is the best key for placement.
So how many lots should you use?
This is a misconception among many builders, placing more lots will slow down the game so 80 lots is better than 200 lots. This is only 50% true, it not actual how many lots you place, it's the actual size of the lots that is more important. If the 200 lots where really tiny lots and then the 80 lots where really big lots, then the 200 lots would load faster.
When you have placed your lots, lets have a little look at the size in KB this will be the total added to your world, when you upload:-
So go to the following location:-
C:\User\YOUR NAME\Documents\Electronic Arts\The Sims 3 Create A World Tool\UserToolData\Worlds\YOUR WORLDS NAME\Lots
This section is where all the current lots in your world are stored before you extract the world, you will notice a number files with name like this "new2_89c30035ac5405d0.lot" after each lot you will have a KB total.
This will probable range from 50KB up to 2000KB, just a word of warning any lot that says more than 2000KB is going to need some powerful PC to run on top specs, you might wish to view this lot and see if there is anything you can do to reduce the lot size. To find your total KB that will be added to your world from lots if you right click with the mouse and select all, click properties, it will give you the total KB.
Here are some bench mark totals, they are not strictly accurate, but I'm not far off
Sunset valley, uses about 35000KB of Lots
Holiday resorts use about 20000KB of Lots
This entire KB size of a worlds can kill your world so it's very important, I would try to keep your world less than 50000KB worth of lots, you can use more, but think about loading times. In Part 11 we will try to reduce the size of them lots, but it will not be by very much perhaps 2000KB at the most.
If you take that total and add that to the total world size found here:-
C:\Users\YOUR NAME\Documents\Electronic Arts\The Sims 3 Create A World Tool\UserToolData\Worlds
This will give you more or less the current total size of your world, most EA worlds range from 65,000KB to 80,000KB so you would say this is the ideal size for a world, but you do have a little room to go higher if you wish, but you will get slightly longer loading times.
VRAM SETUP
Having setup your lots things in CAW start to slow down, long loading times, stuttering scrolling, long saving times etc. I'm afraid we cannot do much about this, it can help a little if you follow this guide:-
This is something you should consider doing, CAW is set up to use 2 GiB of RAM, with this program if you have more RAM than this, then you can force your PC to use the extra RAM while building your world.
You should only need this program while building a large world, it can speed up scrolling about the world, and loading the game, read the instruction prior to using, it does work, I've been using the program for the last 2 weeks with no problems. You will not get a massive speed increase, but in the later stages of building a world, this can help avoid crashes while the game try to access more RAM than you have.
The file you will need to edit is in main program file inside your CAW folder, anyway here is the link:-
http://forums.techpowerup.com/showthread.php?t=112556
Preview
Do not forget to update that preview you started, with the new pics of all the lots you have used, it will be a good time to have a break, you have probable spent many hours, days, months, getting all the lots correctly placed, so have a break, update your preview, watch a few films and relax. ( I bet you don't get many people saying that in guide)
Check lot for Conforming edges
OK breaks over, it's a good time to scroll over, every lot you have built so far and look for, edges that stick up and you can see the edges do not conform with the world. Them lots will need some attention. Try and conform edges on the lots and see if this fixes the problem. If not try moving the lot slightly, if this does not fix the problem a last resort is either remove the lot and try and flatten the terrain around where the lot was and replace the lot. If you still get a problems at this stage, you can either delete the lot or use bushes and trees to cover up the error. Even EA lots are not perfect, just remember this.
Level problems
Dropping terrain, or terrain going higher is a common problem, the best fix for this is remove the lot from the area and flatten the terrain around where the lots was and replace the lot.
My lot as dropped into the sea question?
Sometimes when you place lots that contain parts below sea level, the sea evades the lot, should this happen, the only fix so far is to rebuild the below sea level area. Just a small point on this, you will not notice this problem until you have saved the game and reloaded your world, make a mental note of any lots that are below sea level and double check them,next time you load the game.
Vista level
Lots in beautiful locations, most world will have many such area's. You can edit the vista level during placing the lot, I don't recommend this, it's better done when you have placed all your lots, that way you can get a better picture of which locations are the best.
So to do this now, just select a property and under the property browser, you will see a empty cell called Beautiful Vista, you can set a total in here, from 01-100( I think you can go higher, but not really recommended) Usual 10-30 would be a good total for most places.
Additional Value
You will find the menu for this below the Beautiful Vista menu
To give the world that extra dimension, you don't wont all the house's costing the same, in the real world, a house next to beach with a high vista level should cost more than a house of the same value, that is in a slum area, with zero vista.
This is the cost increase I use, you can make your own, for your world, copy mine or even just ignore this section:-
+1000 Per vista point
+5000 Per Environmental benefits, near a place of work or a positive community lot
+10000 if a beach lot
+10000 For Farm lots
+? Common Sence, this might include a house that as a Rare spawner on it's doorstep
STARTER LOTS
I never give vista points to starter lots, neither do I increase the price, this goes against a little of what I've been saying, but starter lots are just needed, so I don't wish to make them hard to get.
You should also include the price of community lots in this list, it should cost more to purchase a park with a high Beautiful Vista, than a run down scrap yard.
While playing the game, I'm strong believer you should not get something for nothing
WORLD BRIDGE TWEAKING
Back in part 4, we did some bridge building, this would be a good time to double check all the bridges in your world are still connected correctly. You have placed many new lots into the world, you might have tweaked a few roads, so double check everything is OK with your bridges.
Terrain texture tweaking
Like the bridge tweaking, we should also check textures, around where you placed your lots, make sure all the area's around your lots have the correct texture color, you might wish to check textures around the road area's.
Smooth out terrain
Placing lots can bring out terrain problems, if you needed to flatten area's, try to make sure all them area's have smooth terrains.
Side walks again
With the world starting to take shape, it will be a good time to have another look to see if your world needs any more side walks. Placing sidewalks around your house's can add another dimension to your world.
Texture sounds
If you go into your terrain edit tools and rick click on the terrain layer you will see a option to edit, click on this and then you can change the terrain sounds. It's the little touches like this, that will make your world a truly great world. So edit them sounds.
Lot names
Give each lot a cool street names and a realistic addresses
We do this the same way we edited the Beautiful Vista, you will find the menu in the property browser, near the Beautiful Vista menu.
Names are very important, you should either make street names up yourself, research street names on the internet or cheat and use a program that will generate names for you, here is one example http://donjon.bin.sh/name/
The end part 7
Part 8
MORE THAN 8 TEXTURE UPDATE
I've stated that it would be OK to use more than recommend 8 textures, thou I do stand by this statement, many people think it's unwise to use more than the recommended number stated in the manual. Just because one of my worlds works perfectly and that use's a large number textures, does not mean that every world will be the same. Plus many people will fear your world if you break away from the recommended number, so in the interest of your world, if you use more than 8 you do so at your own risk. The best answer will be to test your world, and check for any slow down, prior to using more than 8. It's better to use textures that can do multiple tasks than loads of textures.
Object Placement
With building a world, there is never a strict way people build worlds, the method I've been showing is much the way I build worlds.
So lets have a look at objects, here a few things not to do, never place a object so the sides touch a lot and when you place a large number of objects, tree's for example, watch for the double tap and you place a random object in a odd place. Of course during beta testing you might find the object, but it does not look good if you miss the object.
So what I do to place object is do them in order they are in CAW with some exceptions, which I will go into more detail later in this section.
So for now open your world in CAW, start a new Global Layer, click on Game Objects and then open the Environment section, starting with the first placeable objects Abandoned Train Bridge, so the second objects to be placed will be the Abu Simbel, the reason I do the objects in this strict order is so that I do not miss anything, I will view every object one at a time to see if it's needed in the world. At this time it's a good time to miss fences and Lights, both them will take a very long time to place correctly, plus you might be unsure on which streetlights will be the best for your world.
The length of time to place objects will be different for each world, but this is the backbone of any good world, place to few objects and your world looks barren and place to many the world becomes cluttered and unrealistic. So make a balance between the two.
Several hours later.........
It will be a good time to place them Streetlights, details around roads is very important, your world should contain streetlights and even them small grids, it all adds to the illusion of the world. In my current world it did take nearly 8 hours to correctly place all the street lights and you can see the difference:-
This is just one random pic from my world the streetlight are like this all over the world, it will give a much more enjoyable playing experience to the player during the night,
Killing two birds with one stone, streetlight placement will make you see in detail all the roads in your world, you can take this time to check all the roads are connected and do your best to clean up bumps etc.
I've yet to play a world that does not contain a few minor errors in the road design, so you don't need to be 100%, but getting the road to a playable level is a must, so take your time.
Several Hours later........
Fences are very useful for adding even greater depth to a world, you walk about your own town you probable see a fences everywhere, so your world should contain this also. This again can take several good hours to do correctly.
ADVANCED OBJECTS GUIDE
Reading this tutorial will give you idea of how to use more advanced tricky stuff in your world, it's not essential, but having this knowledge will help design some unique situation that might arise while building.
http://builders.forumotion.net/useful-tutorials-f10/lost-found-t1125.htm
Cluster Trees
I try not use the cluster tree button in the world until I'm happy with the tree placement, I never given this much study, I do think it's better for the speed of the game that you keep your trees in clusters. So I would select a tree and click the cluster tree button.
Edit the town area
The town area for you world is the heart of the world, even if you do less detail object placement on the rest of the world, I would double check this area, make sure you have streetlights and other road objects.
Tweak terrain around objects-optional
How detailed do you want your world? That's the question you should ask, when does building a world stop becoming fun? The correct method to tweak all the objects with terrain, for example, place a little dirt under each tree. How many hours will this take is the next question?
You could do about 60-100 trees in 1 hour, it will take forever to do them all, this is your call, like everything in the Sims 3, make a judgment call if you think the benefit to your world will be worth spending the next 10 hours adding terrain to each tree. I wanted to include this in the guide, some world builders will go to that level of detail. Perhaps something in the middle might be a better choice, set yourself a time limit say 1-2 hours and add some terrain to base of some of your trees and check the objects have the correct terrain around them.
Make Sims
You will have been building your world for many weeks by this point, so have a break, you should start thinking about the Sims in your world.
Before you do this, what approach will you take with adding Sims to your world, each approach as benefits and disadvantages:-
1 No Sims, people will need to add the Sims themselves
2 Add Sims directly into Caw, you can find info on this here
http://www.moreawesomethanyou.com/smf/index.php?topic=18814.0
3 Include a save game usual shortly after release.
4 Make a Sims pack, separate download that contains the Sims you made, to be used in the world.
5 Set up a challenge and try and get other people to make your Sims
Have a good think about which path you will take, here are few tips that I can think off, if your world is huge, then option 2 would not be a good idea, the reason them Sims will add a great deal to your upload/download size. Option 1 is not a good idea for a theme worlds, for example if your building Horror world, the player might find it hard to find 50 or so Sims to populate the world, that work well with a horror world.
In my recent world I went with option 4, my world is a generic base world, no real theme, so it gave me the freedom to make many different types of Sims. But you need to pick the best option for you.
One last thing about your Sims, I strongly recommend the first wave of Sims for the world, should be custom content free, you wont people to have access to the Sims and not worry about problems, due to people missing custom content. If you do include custom content I would use option 4, then you can include the custom content with the Sims pack, the less download people need to make, the better.
Preview
That really ends part 8, don't forget to update your preview with them new pics with the world objects in.
Part 9
We near the end of your world and the last few parts are about mopping up and testing your world
Time for Trees revisited
By this point you might have already planted your trees, if you are following this guide. Many trees are found in the game objects section, under this section you will find a sub section called trees, this contains many of the plants and other greenery, you are best using this to fine tune your world, this will give your world a extra splash of color. Like the objects you could work down this list alphabetically, so you don't miss anything.
Roads again
I understand much of this guide, goes back over stuff you have already completed. I've found while building you get odd stuff happening to stuff you have already completed, the less you after to correct during beta testing the better. So double check your road, make sure you have no tree/plants that have found the way onto the road, I'm sure some of the plants in the Sims 3 are related to the triffids.
Hiking area's-Optional
With all the trees down you could design a few hiking area's for your Sims to explore the inner world with. This can be done with terrain paint or sidewalks, both ways are good.
Tweak INI Files-Optional
I did go over this in part 2, I could write a book on this section, I don't fully understand what everything in them files do. But I've had a good play about with the files, If you are going to use INI files in your world, you should check they all are working in game, you don't need them all, should you decide not to tweak something then EA default will take precedence.
Are the INI worth the extra energy? my answer to this is yes, it does give your world a feeling of depth, here is a sneak preview of the finished Exotic world INI that I will be using in my upcoming world:-
You can see by the 1st photo, this is , my world on a clear day, the next photo shows a sunset on a cloudy day and the final photo you can see the world on a stormy day, notice the almost black sea, compared to the bright blue of a sunny day. All this will had depth and feeling of passing seasons and weather. Research into this could be worth the extra energy, in the next few weeks, it might already be released if your reading this late, my world will be released, feel free to extract the INI files I've used, edit them or just place them straight into your own world. If you still wish to use INI and wish some help making them, you can PM me and will try to help, if possible.
Effective Effects
A fun part of world building is adding effects to your world, a small number of effects are better than a large number of effects that slow down your world. This will be a good time to place all them effect you wish to use. How long you spend on this stage will depend on you, building a waterfall make take several hours, but all the other effects should not take you long.
Rainbows
Many people have problems getting rainbows to work in the world, this was a test I made:-
The world was loaded inside caw, then I run the in game editor, this was the result of my test world after 3 days:-
Not good, no rainbows
It looks like the game needs a little helping hand when it comes to rainbows, my research leads me to belief, without INI files placed directly into the world file, it will be very rare that the game will spawn a rainbow, if ever. How many rainbows have you viewed while playing?
All is not lost, if you are using INI, then this will make you happy, I repeated the test with 30+ rainbows on the same Island, the moment the first rays of the sun hit the Island on the third day, bang an explosion of color:-
The INI files you will need to do this are the sky INI files and the most important of them files is the INI files that deal with weather. You will find them in the following location
C:\Program Files (x86)\Electronic Arts\The Sims 3\GameData\Shared\NonPackaged\Ini
I strongly recommend that you read part 2 of this guide about using INI files, should you decide to use them.
If you have no desire to use INI files in your world, then my advice would be just to remove all rainbows from your world, they are not really any use. The chance of them spawning is very small to nil.
SkyCommon INI
This is just a follow on to the rainbow part for anybody using INI files, the SkyCommon INI files contain a line that says:-
;; generate new cloud cover every N hours
WeatherRandomizeInterval = 8
I recommend you change EA setting to a odd number, I use 15 in my world, this works good. All this setting does is the time interval between weather changes, so if you keep 8, then when you first load in the game the weather will change on the following times:-
8/16/24
using a odd number, will make the weather change harder to predict, plus you can get some nice effects when the weather changes at sunsets etc.
You can change this file in notepad, make a backup first.
PART 10
We edge ever closer to the end.
Spawner Time
Very late in making your world, is making the spawners for your world, why I do this very late in the building stage, the main reason for this, you will have more or less everything in your world completed, this will give you a much greater picture of all the places of interest and give you a better perception of where to place the spawners.
You can find all the spawners you will need under the Game Objects, I place them the same way I place the objects in part 9, in alphabetical order, that way you reduce the chance of missing any spawners.
Before you start dropping down spawners, you should have a idea, how rich you wish your world to be resources? Does your world contain resources from the expansions EPA, the world adventures comes with loads of new spawners, which are not normally contained inside a base neighborhoods Does your world not have a certain spawner, example of this you are building a desert world and you remove a number of common butterfly spawners from your world. If you plan to have less spawners than a normal neighborhood then I recommend that you make this info available in the media of the world when you showcase your world, that way at least players will understand and they are not looking for something that is not there.
So how many spawners should I use?
Think of it like this , you cover the all the water that is not a sea with fresh water designators, the graveyard should contain the deathfish and the science area should contain the robofish, this would be normal practice, if you change this then a note should be made in the media when you preview your world. Another rule to follow would be common, should be more common than uncommon and rare, you can break this rule but making rare spawners will change the gameplay for the player, you could make a good living of just collecting rare spawners.
Where to place them?
Look for logical places around your world, example if you built a mine place some rock spawners around this area, seed spawners can be in the forest areas etc.
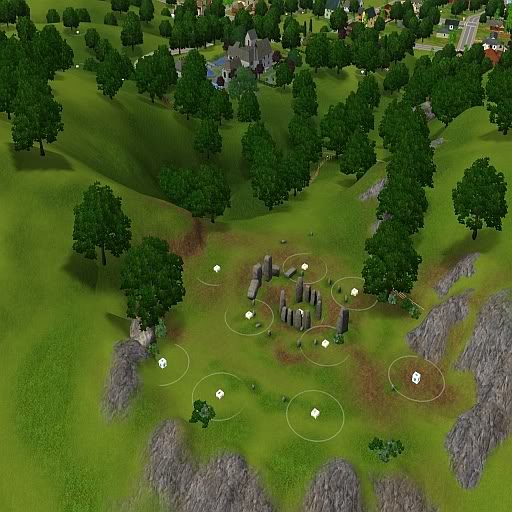
Before we go on lets have a look at the spawners placement for sunset valley:-
Notice EA use a number of spawners around the mine area
The seed spawners are places inside the tree area's
The Stonehenge is used for many more spawners
EA use the science dome to place a few more spawners
You can see EA do not go crazy and place hundreds of spawners, the best placement you can do is make the places more logical and use landmarks for spawning points.
Change Rabbit Holes and graphic changes-optional
This is rather complex tutorial, so what I'm going to do is show you how to make a simple change, the moon, from this you can take this to any level you feel your ability can take you.
Remember this is a pretty new idea, many people will fear downloading worlds that contain graphic changes, so let me put your mind at rest.
First all changes that you make by using this method will stay inside the world.
The game will take slightly longer to setup the more changes you make, this only seems to happen on the first time you load in the world. When you have setup the world, the graphic changes seem to get cached, so the increase in loading times, you only pay once for.
You get no slow down when using edited graphics, infact the area's you edit seem to work better, my conclusion on this, you are loading the graphic direct from my documents. Of course if you use very high graphical changes with maxed out texture quality that might be a different story.
They are not custom content in the sense somebody can share your work, what you make, will stay inside the world, should somebody reupload a lot from that world they will not get the edited graphics.
You have no downside for using them, other than they are a very new way to fine tune your world and people fear what is new.
Ok lets start with a simple recolor, nothing to fancy, the Moon, in my world I wanted a red moon, so lets turn the moon red.
1 First download s3pe, you can download the latest version here:-
http://dino.drealm.info/den/denforum/index.php?PHPSESSID=1mkust159gohfd19r3urgp4sm1&topic=189.0
2 Install S3pe, open the program and make sure you have the sort, display and tags all ticked, you will find them at the bottom of the screen
3 The way you do this is to extract the texture IMG file using S3pe, you can find the textures here:-
C:\Program Files (x86)\Electronic Arts\The Sims 3\GameData\Shared\Packages
FullBuild0 file contains the image file for the moon
The textures work much like INI files, your best editing the texture and check they work ok in backup copy of your world, if everything work, then like the INI files they should be last thing you do prior to exporting your world.
So the moon file must be exported, rick click on the Moon file and then export, then from file, it should give a save location, place the file on your desktop
4 Now you can edit the file using Gimp or any other program that can read and edit image files. I will be using Gimp for this example. If you have never used Gimp or played about DDS before, you will need to read some tutorial to help you, this goes beyond what this tutorial is about. Now I've got the moon in my grasp I just used the colors menu at the top of the page and selected color balance or you can use colorize and moved the sliders until I got a color I was happy with.
5 When I was happy with the result, all I did was save the file under BC3/DX5 format, you can use DX1 format if you wish, but I tend to only use this if the file contains no transparency. Just override the file you extracted using S3pe.
6 Now that you have edited the pic, you will need to test the moon inside the game, you can either do this now, by importing this file into your world and then view the world ingame or leave the checking until you have completed all edited graphic you wish to change. To import the file into your world, open your world with s3pe and the click resource on the top menu and then import from file, you can then test your moon.
7 Like the INI files, you should only add edited graphic changes prior to extracting your world, should you save the game inside CAW, the next time you load CAW you will lose the changes, the trick to getting the files in a extracted world is to place them prior to extracting
8 Here is the moon inside the game:-
The moon looks great for any Halloween town, of course you are not just limited to edit the moon, if search all the FullBuild files with s3pe, you will find loads of images you can edit inside your world, here are some examples:-
That is the very basic guide on how to edit a basic image, more complex designs, example the Rabbit holes can also be edited, to do them you need to extract all the image files then your best load each image in DDS image viewer. I use Infraview with dds plugin, it's free. Anyway when have viewed the image you can either edit the image or delete the image. Should decide not to edit that image, but you wish to edit just the windows of a rabbit hole for example, then anything you don't edit EA files will appear instead. General rule to follow when editing more complex textures, I was just delete all the non picture files, they are mainly to deal with the shape and lighting of the object.
If you have any problem, try to post them here and I will try to help.
Delete world cache
We will mop up this part by delete the world cache, goto the following location:-
C:\Users\YOURNAME\Documents\Electronic Arts\The Sims 3 Create A World Tool
Now complete delete the following folder WorldbuilderCache
Nothing like keeping your world clean, the game will spawn a new cache next time you load.
Final Preview
It's time, your world is 90% complete, the last 10% is mainly to do with tweaking and testing, so you could say your world is 100% complete, but don't be so eager to upload yet, you still have several key things to do, the main thing is Beta testing. So be happy, with your last preview before release, do not give everything away about your world in this last preview, keep some of the best pics back for the final release.
Coming soon Part 11
Part 11 can be found here:-
http://builders.forumotion.net/caw-101-f122/building-a-world-part-11-t1187.htm#20050
Most Viewed Topics
Search
Latest topics
» Guide to Houseboats in game & in CAW by SimGuruSemedi, EA IP Forum
by Archivist Thu Apr 02, 2015 11:46 pm
» Guests May Post Here
by Archivist Mon Nov 24, 2014 12:45 am
» Fancy Friezes Using Corniches
by Archivist Mon Sep 22, 2014 11:07 pm
» Building Basics ~ Lessons for Beginning Builders
by Archivist Mon Sep 22, 2014 10:56 pm
» Caw FAQ's........Links to Tutorials, and Resources. Textures, & Troubleshooting from EA Caw Forum
by Archivist Sat Aug 16, 2014 3:27 am
» CAW tutorial - first contact by Anushka @ Carl and Pam's The Sims 3 Forum
by Archivist Wed Aug 13, 2014 2:56 am
» Steam installation, and Caw by LittleMinxUndr
by Archivist Wed Aug 13, 2014 2:29 am
» Procedural Generation of Terrain Discussion and Tips: Two Tutorials Posted
by Archivist Fri Jun 20, 2014 3:15 am
» Why CC Should Not be Packaged with a World, & How to Ensure it Isn't by Simsample, EA Caw Forum
by Archivist Sat Feb 08, 2014 1:38 am
» How To: Upload Caw Files to Share by auntielynds
by Archivist Sat Feb 08, 2014 1:29 am
» Pinstar1161 The Legacy Challenge Rules
by Archivist Sat Feb 08, 2014 1:12 am
» Building Apartments and Bars using EA's Shells by Richdre @ BMC
by Archivist Tue Nov 12, 2013 10:19 pm
2-Building a world Part 7-10 by Stw402

Archivist- Posts : 220
Join date : 2010-12-04


|
|
|